This is the third post in the series. The previous post covered how I got networking in place. But that was very rough and tumble. The bare necessities if you will. Now I need to get out into the weeds. This worked on my laptop but that wouldn't be enough.
Cross-platformization
This game needs to be playable on any platform. Right now I use it on MacOS with the BSD sockets API. So in order to go cross-platform, I need a cross-platform library.
After doing a little digging, Boost.ASIO was more than sufficient. Boost was also designed as a plug-and-play add-on to C++ so that made it sufficiently easy to add.
However moving from the regular sockets API to the Boost ASIO was non-trivial because of the difference is design patterns.
Building with Boost
This was simple enough for a single machine configuration. All I had to add was the following line to Cmake.
# find boost
find_package(Boost 1.84 REQUIRED)
The challenge arose now
- Do I package all of boost with the game under
lib? - Do I expect the users to have boost downloaded on their system ?
I went with the latter. The only problem was the some users may not have Boost installed. You need to manually install with
sudo apt install libboost-all-dev # for Ubuntu/Debian
brew install boost # for MacOS
Sorry Windows folks. I don't believe you exist. As such I cannot build a game for you.1
OK, cool but even if you did install there's no guarantee that it will be an acceptable version. If I'm using the APIs of 1.86 and the system has 1.75, who knows what could go wrong. This turned out not to be a problem for MacOS because as you will see in the App Building, it automatically binds the libraries and packages them with the .app which was beautiful.
Changing to use io_context
Now that we have Boost.ASIO as part of the libraries, how do we use it ? Boost.ASIO makes use of something called a io_context (an execution context). As per their documentation

Your program would call the socket object. The socket object sends this to the io_context. This is the translation layer for the platform. This is why my code would work on both Arch Linux and Windows and everything in between. The io_context then sends it to the drivers in the OS and then it gets passed back up the way it came.
The problem now arose with ownership especially on the server. Who owns these socket objects ? How do they get passed around ? And when do they go out of context ? I didn't deal with these problems before because they were just integer (socket descriptors). Trivial. When you have a
class GameServer {
    private:
        // networking information
        boost::asio::io_context m_ioctx;
        tcp::acceptor m_acceptor;
while (m_running) {
		tcp::socket client_sockfd(m_ioctx);
		tcp::endpoint client_conn_addr;
		m_acceptor.accept(client_sockfd, client_conn_addr);

		/* now we have client_sockfd that will go out of context
		   at the end of this while  */
}
So what do we do with this ? Naturally just move it to the thread function handle_client. Ok good.
We have a Player class that takes over once we know the client's UDP address. Essentially after all the setup work is done, the Player class is responsible for sending and receiving messages from the client and keeping the Player's stats updated. But to make a socket, we need an io_context. So do we have 2 io_context s ? Apparently no. It just boiled down to letting the Player class access the GameServer's io_context by reference.
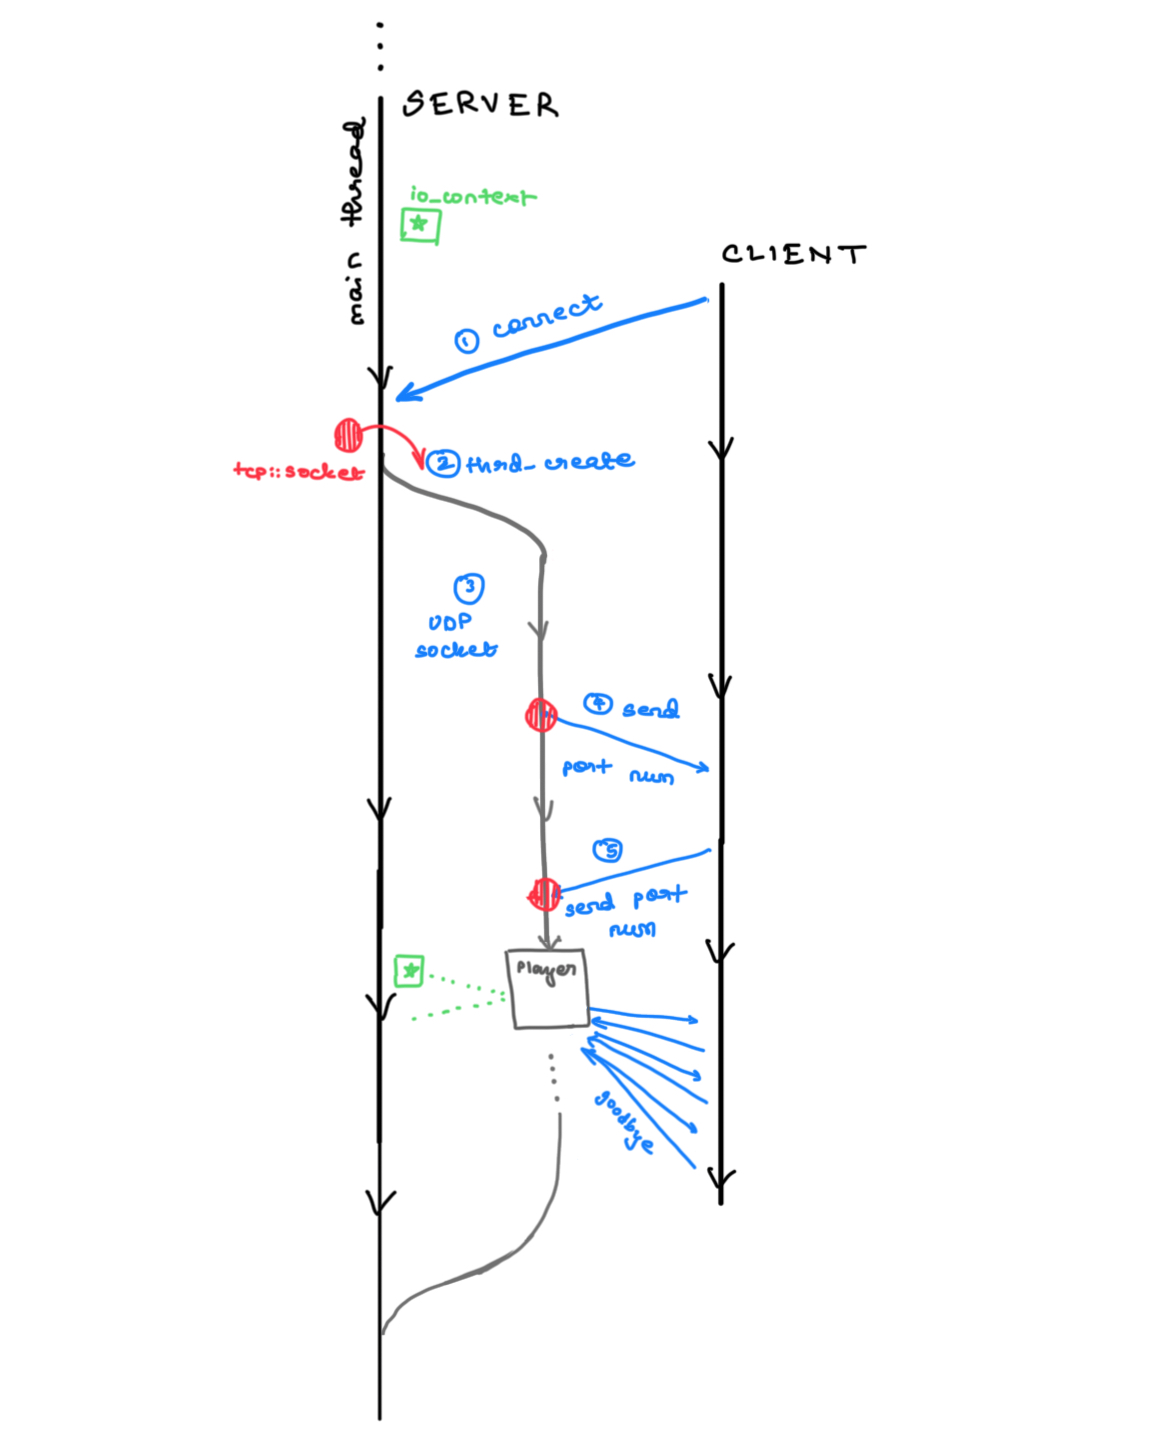
In code that looked like this
// src/server/Game.cpp
Player::Player(uint32_t game_id, boost::asio::io_context &ioctx, udp::endpoint client_addr) : m_client_udp_socket(ioctx) {
	m_player_id = generate_random_uint32(0, UINT32_MAX);
	m_game_id = game_id;
	m_x = 300.0, m_y = 300.0;
	m_peer_client_addr = client_addr;
	m_local_addr = udp::endpoint(udp::v4(), 0); // let OS choose available port
	m_client_udp_socket.open(udp::v4());
	m_client_udp_socket.bind(m_local_addr);
	m_local_addr = m_client_udp_socket.local_endpoint();
}
// src/server/GameServer.cpp
auto new_player = Player(game_id, m_ioctx, client_addr);
auto new_player_id = new_player.get_player_id();
This fixed those pesky troubles with ownership.
Migrating to Websockets
Why move to Websockets when you have the lowest latency socket - UDP ? Well the following reasons
- Easier to use.
- Sudden termination is handled.
- Routing and traffic control is handled
- Encrypted traffic over TCP
The most obvious choice was obviously Boost.Beast because I already added Boost libraries to the toolchain. This was the new setup. Much simpler with no hassle for ports. This was point #1.
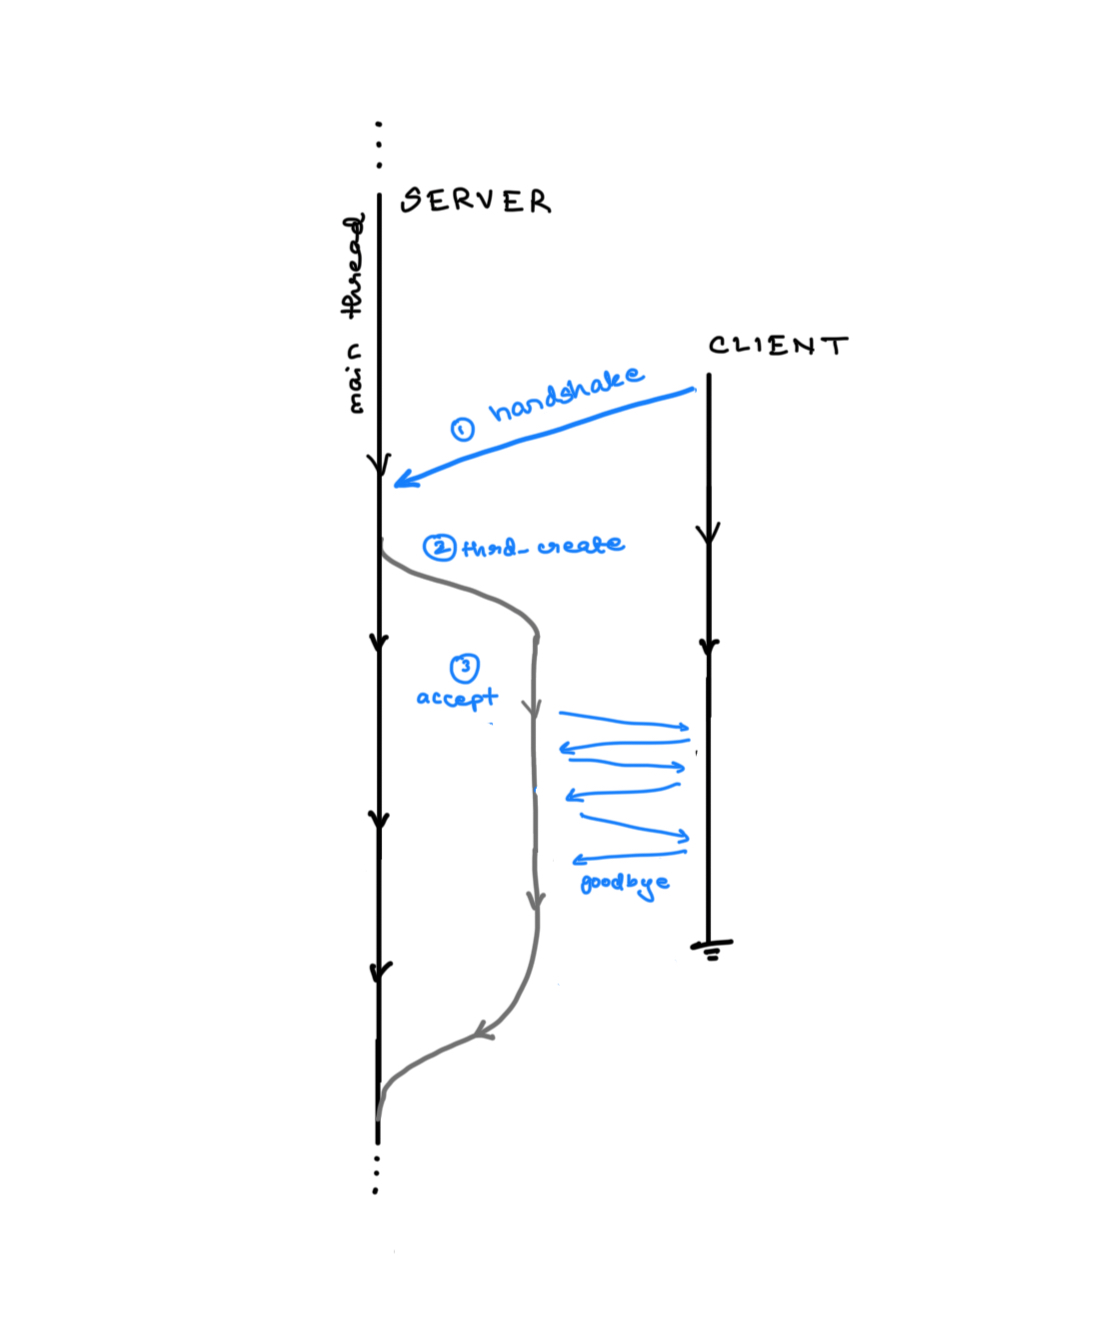
For point #2, remember that if the client crashes on a UDP socket, the server would never know. There would be no GOODBYE message that comes through to let the server know that the client is disconnecting. But for websocket, if the client's crashes, the connection terminates. We get a Broken pipe. This WS connection would automatically terminate letting the server know that the client has disconnected.
For point #3 and #4, these come as part of Websocket being built upon TCP.
Boost.Beast has a lot of starter code to help you set up. They make it very easy to integrate into your codebase with a simple write and read API. Migrating was simple enough because it was a natural step from ASIO.
Logging
Why not simple std::cout ? This change was mainly motivated by the server code. Since each of clients were handled in a different thread, we would need a threadsafe printing approach.
Boost.Logging makes it dead simple to add logs. I didn't need anything fancy so I just followed their tutorial here
#include <boost/log/core.hpp>
#include <boost/log/trivial.hpp>
#include <boost/log/expressions.hpp>

void init()
{
    logging::core::get()->set_filter
    (
        logging::trivial::severity >= logging::trivial::info
    );
}

int main(int, char*[])
{
    init();

    BOOST_LOG_TRIVIAL(trace) << "A trace severity message";
    BOOST_LOG_TRIVIAL(debug) << "A debug severity message";
    BOOST_LOG_TRIVIAL(info) << "An informational severity message";
    BOOST_LOG_TRIVIAL(warning) << "A warning severity message";
    BOOST_LOG_TRIVIAL(error) << "An error severity message";
    BOOST_LOG_TRIVIAL(fatal) << "A fatal severity message";

    return 0;
}
So by scattering BOOST_LOG_TRIVIAL throughout the code and replacing all std::cout / std::cerr, I got logging in place. This was rather trivial. It took less than an hour.
Deploy, deploy, deploy
The time had come to gtfol2. The obvious option was EC2. So I went ahead with creating a t2-micro instance in US-East. The essentials of what I had to do to connect were
- Change the security group settings so allow incoming UDP packets from ports 4096-65535 and the same for outgoing UDP packets
- Create an internet gateway and attach to the EC2 instance so it can communicate with the public internet.
- SSH into the machine
- Download the necessary prereqs
- Build the executables
- Start up the
mazefigher-server
#4 and #5 took some time because these were Ubuntu 22.04 machines so all the package versions were out of date, meaning I had to update CMake. Furthermore, I had to modify the build process to have flags BUILD_SERVER and BUILD_CLIENT. I don't need the SFML libraries in the server so we can set BUILD_CLIENT=OFF.
After having deployed, I ran some experiments on latency and these were the results.
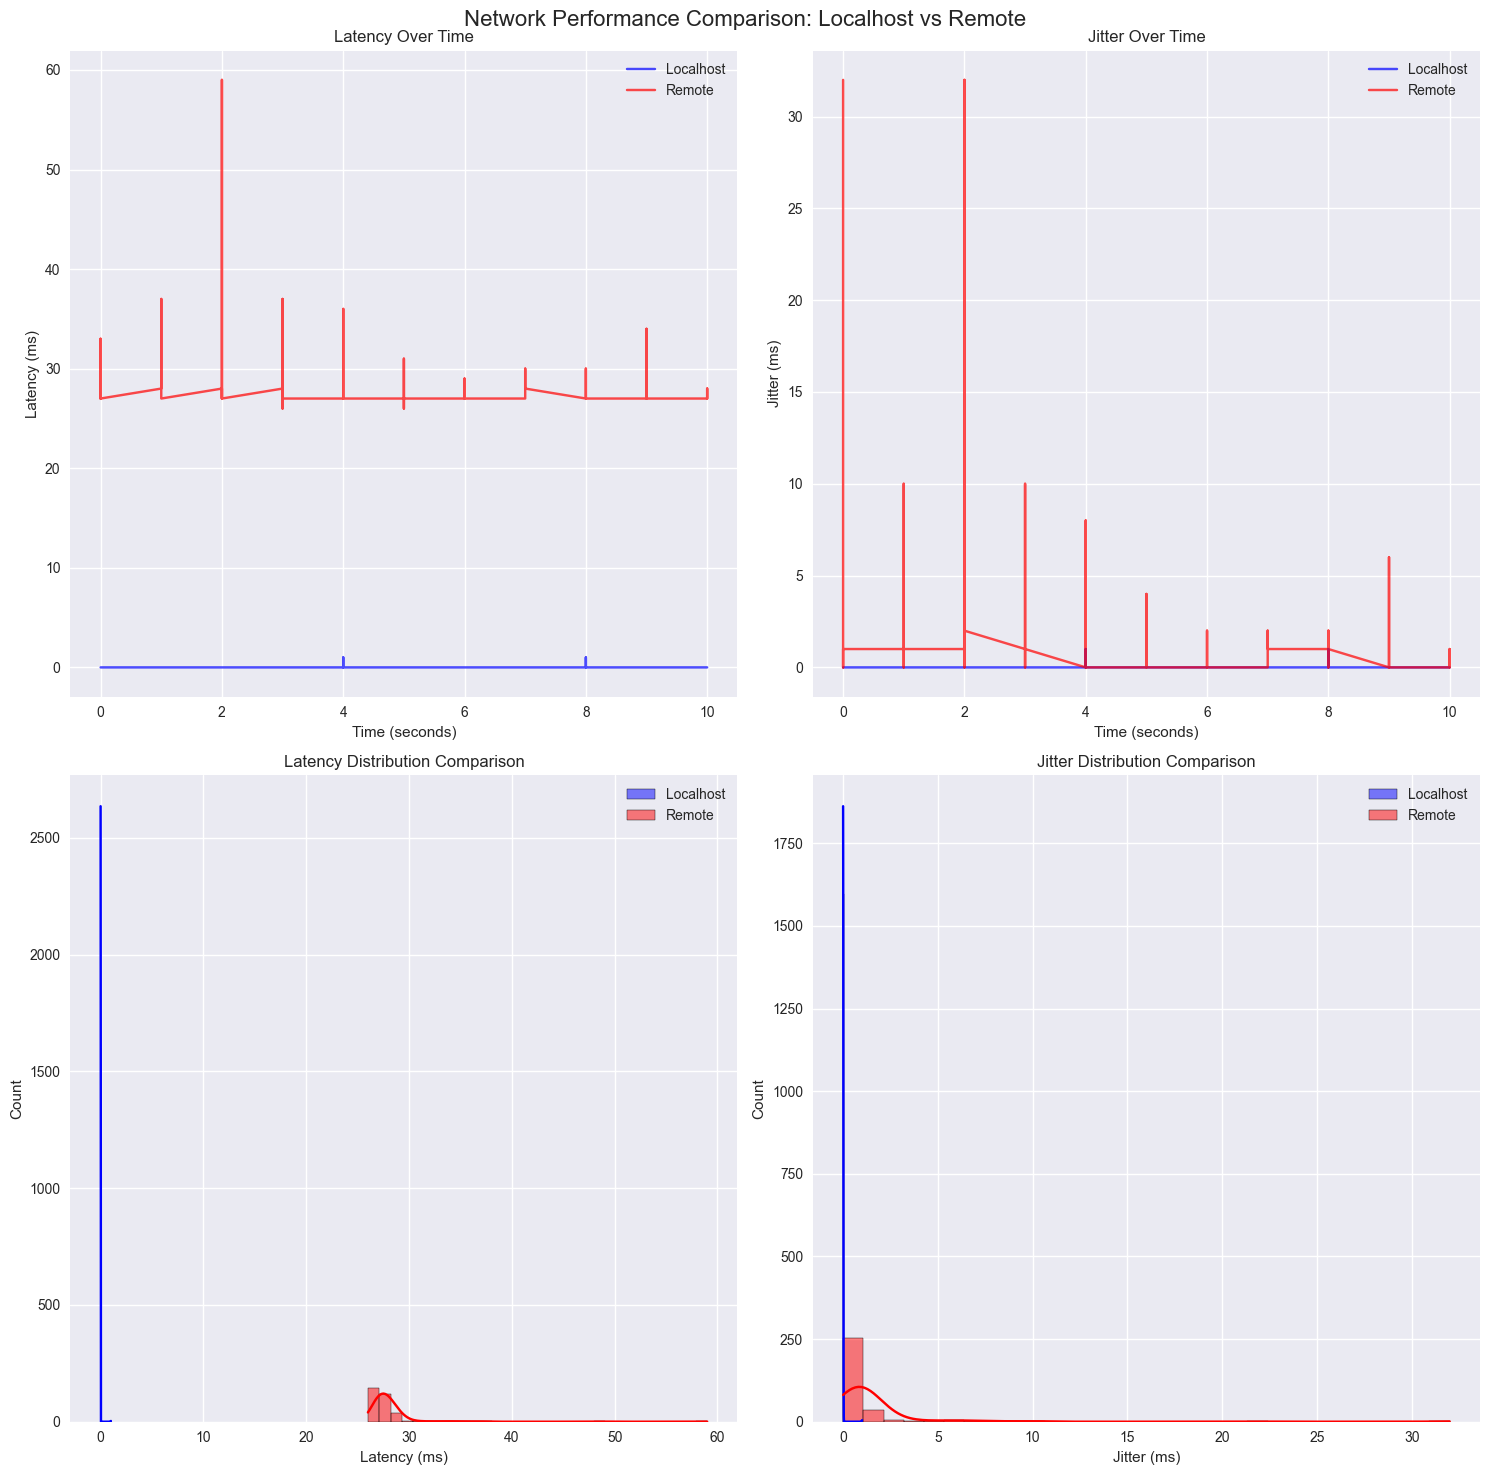
Performance Ratios (Remote/Localhost):
========================================
Average Latency Ratio: 22466.14x
Average Jitter Ratio: 591.21x
Total Bytes Sent Ratio: 0.20x
Total Bytes Received Ratio: 0.20x

Network Metrics Comparison

Latency (ms):
----------------------------------------
Metric          Localhost       Remote          Difference
------------------------------------------------------------
mean            0.00            28.05           28.05
std             0.04            2.55            2.51
min             0.00            26.00           26.00
50%             0.00            28.00           28.00
max             1.00            59.00           58.00

Jitter (ms):
----------------------------------------
Metric          Localhost       Remote          Difference
------------------------------------------------------------
mean            0.00            1.48            1.47
std             0.05            3.12            3.07
min             0.00            0.00            0.00
50%             0.00            1.00            1.00
max             1.00            32.00           31.00
While this was an initial test on the latency, using EC2 for the server was pretty tedious. Everytime I had a new branch or some new changes, I had to manually SSH into the instance, stop the game server, rebuild and then start up again. The problem arose when the EC2 instance kept crashing whenever I built because the memory required exceeded the limit.
App Building
Now it came to building the app, since I was on MacOS, I only did it for MacOS. In that case, an .app is simply a directory.3
├── Mazefighter.app
│   └── Contents
│       ├── Info.plist
│       ├── MacOS
│       ├── Resources
This is the directory structure. In Contents/MacOS , you place your compiled executable mazefighter-client. In Resources you have to place whatever the client will need to access. This could easily be accessed by
// Function to get the resource path
std::string getResourcePath() {
    CFBundleRef mainBundle = CFBundleGetMainBundle();
	std::cout << mainBundle << std::endl;
    CFURLRef resourcesURL = CFBundleCopyResourcesDirectoryURL(mainBundle);
    char path[PATH_MAX];
    if (!CFURLGetFileSystemRepresentation(resourcesURL, TRUE, (UInt8 *)path, PATH_MAX)) {
		  std::cerr << "Failed to get resources " << std::endl;
    }
    CFRelease(resourcesURL);
    return std::string(path) + "/";
}
What about the libraries needed to run the client ? Boost and SFML ? Great question. MacOS has this brilliant tool called otool. otool finds out what dylibs are necessary for an executable to run.
$ otool -L Mazefighter.app/Contents/MacOS/mazefighter-client
Mazefighter.app/Contents/MacOS/mazefighter-client:
	/System/Library/Frameworks/Foundation.framework/Versions/C/Foundation (compatibility version 300.0.0, current version 3107.0.0)
	/System/Library/Frameworks/CoreFoundation.framework/Versions/A/CoreFoundation (compatibility version 150.0.0, current version 3107.0.0)
	/opt/homebrew/opt/sfml/lib/libsfml-graphics.2.6.dylib (compatibility version 2.6.0, current version 2.6.2)
	/opt/homebrew/opt/sfml/lib/libsfml-window.2.6.dylib (compatibility version 2.6.0, current version 2.6.2)
	/opt/homebrew/opt/sfml/lib/libsfml-system.2.6.dylib (compatibility version 2.6.0, current version 2.6.2)
	/opt/homebrew/opt/openssl@3/lib/libssl.3.dylib (compatibility version 3.0.0, current version 3.0.0)
	/opt/homebrew/opt/openssl@3/lib/libcrypto.3.dylib (compatibility version 3.0.0, current version 3.0.0)
	/opt/homebrew/opt/boost/lib/libboost_log_setup.dylib (compatibility version 0.0.0, current version 0.0.0)
	/opt/homebrew/opt/boost/lib/libboost_log.dylib (compatibility version 0.0.0, current version 0.0.0)
	/opt/homebrew/opt/boost/lib/libboost_chrono.dylib (compatibility version 0.0.0, current version 0.0.0)
	/opt/homebrew/opt/boost/lib/libboost_filesystem.dylib (compatibility version 0.0.0, current version 0.0.0)
	/opt/homebrew/opt/boost/lib/libboost_system.dylib (compatibility version 0.0.0, current version 0.0.0)
	/opt/homebrew/opt/boost/lib/libboost_atomic.dylib (compatibility version 0.0.0, current version 0.0.0)
	/opt/homebrew/opt/boost/lib/libboost_thread.dylib (compatibility version 0.0.0, current version 0.0.0)
	/usr/lib/libc++.1.dylib (compatibility version 1.0.0, current version 1800.101.0)
	/usr/lib/libSystem.B.dylib (compatibility version 1.0.0, current version 1351.0.0)
Notice how all of these are system-wide libraries. We need these libraries to be packaged. That's when the next handy tool comes in - dylibbundler. You only need to run
dylibbundler -od -b \
    -x Mazefighter.app/Contents/MacOS/mazefighter-client \
    -d Mazefighter.app/Contents/libs/
What dylibbundler does is simple.
- Dependency Analysis: Dylibbundler scans the executable or plugin to identify all required
.dylibdependencies using tools likeotool. - Library Bundling: It copies the identified
.dylibfiles into a designated directory (typically inside the app bundle, such asContents/libs). - Path Fixing: The tool modifies the paths in the executable and the bundled libraries so that they reference their new relative locations within the app bundle instead of absolute paths like
/usr/local/lib.
After running dylib, you can try otool again
$ otool -L Mazefighter.app/Contents/MacOS/mazefighter-client
Mazefighter.app/Contents/MacOS/mazefighter-client:
	@executable_path/../libs/libsfml-graphics.2.6.2.dylib (compatibility version 2.6.0, current version 2.6.2)
	@executable_path/../libs/libsfml-window.2.6.2.dylib (compatibility version 2.6.0, current version 2.6.2)
	@executable_path/../libs/libsfml-system.2.6.2.dylib (compatibility version 2.6.0, current version 2.6.2)
	@executable_path/../libs/libssl.3.dylib (compatibility version 3.0.0, current version 3.0.0)
	@executable_path/../libs/libcrypto.3.dylib (compatibility version 3.0.0, current version 3.0.0)
	@executable_path/../libs/libboost_system.dylib (compatibility version 0.0.0, current version 0.0.0)
	/usr/lib/libc++.1.dylib (compatibility version 1.0.0, current version 1800.101.0)
	/usr/lib/libSystem.B.dylib (compatibility version 1.0.0, current version 1351.0.0)
Notice now that they're all in the libs directory within the .app . We've now bundled.
By doing these and throwing in whatever random sprites and textures I could get my hands on, I had the following app finally.

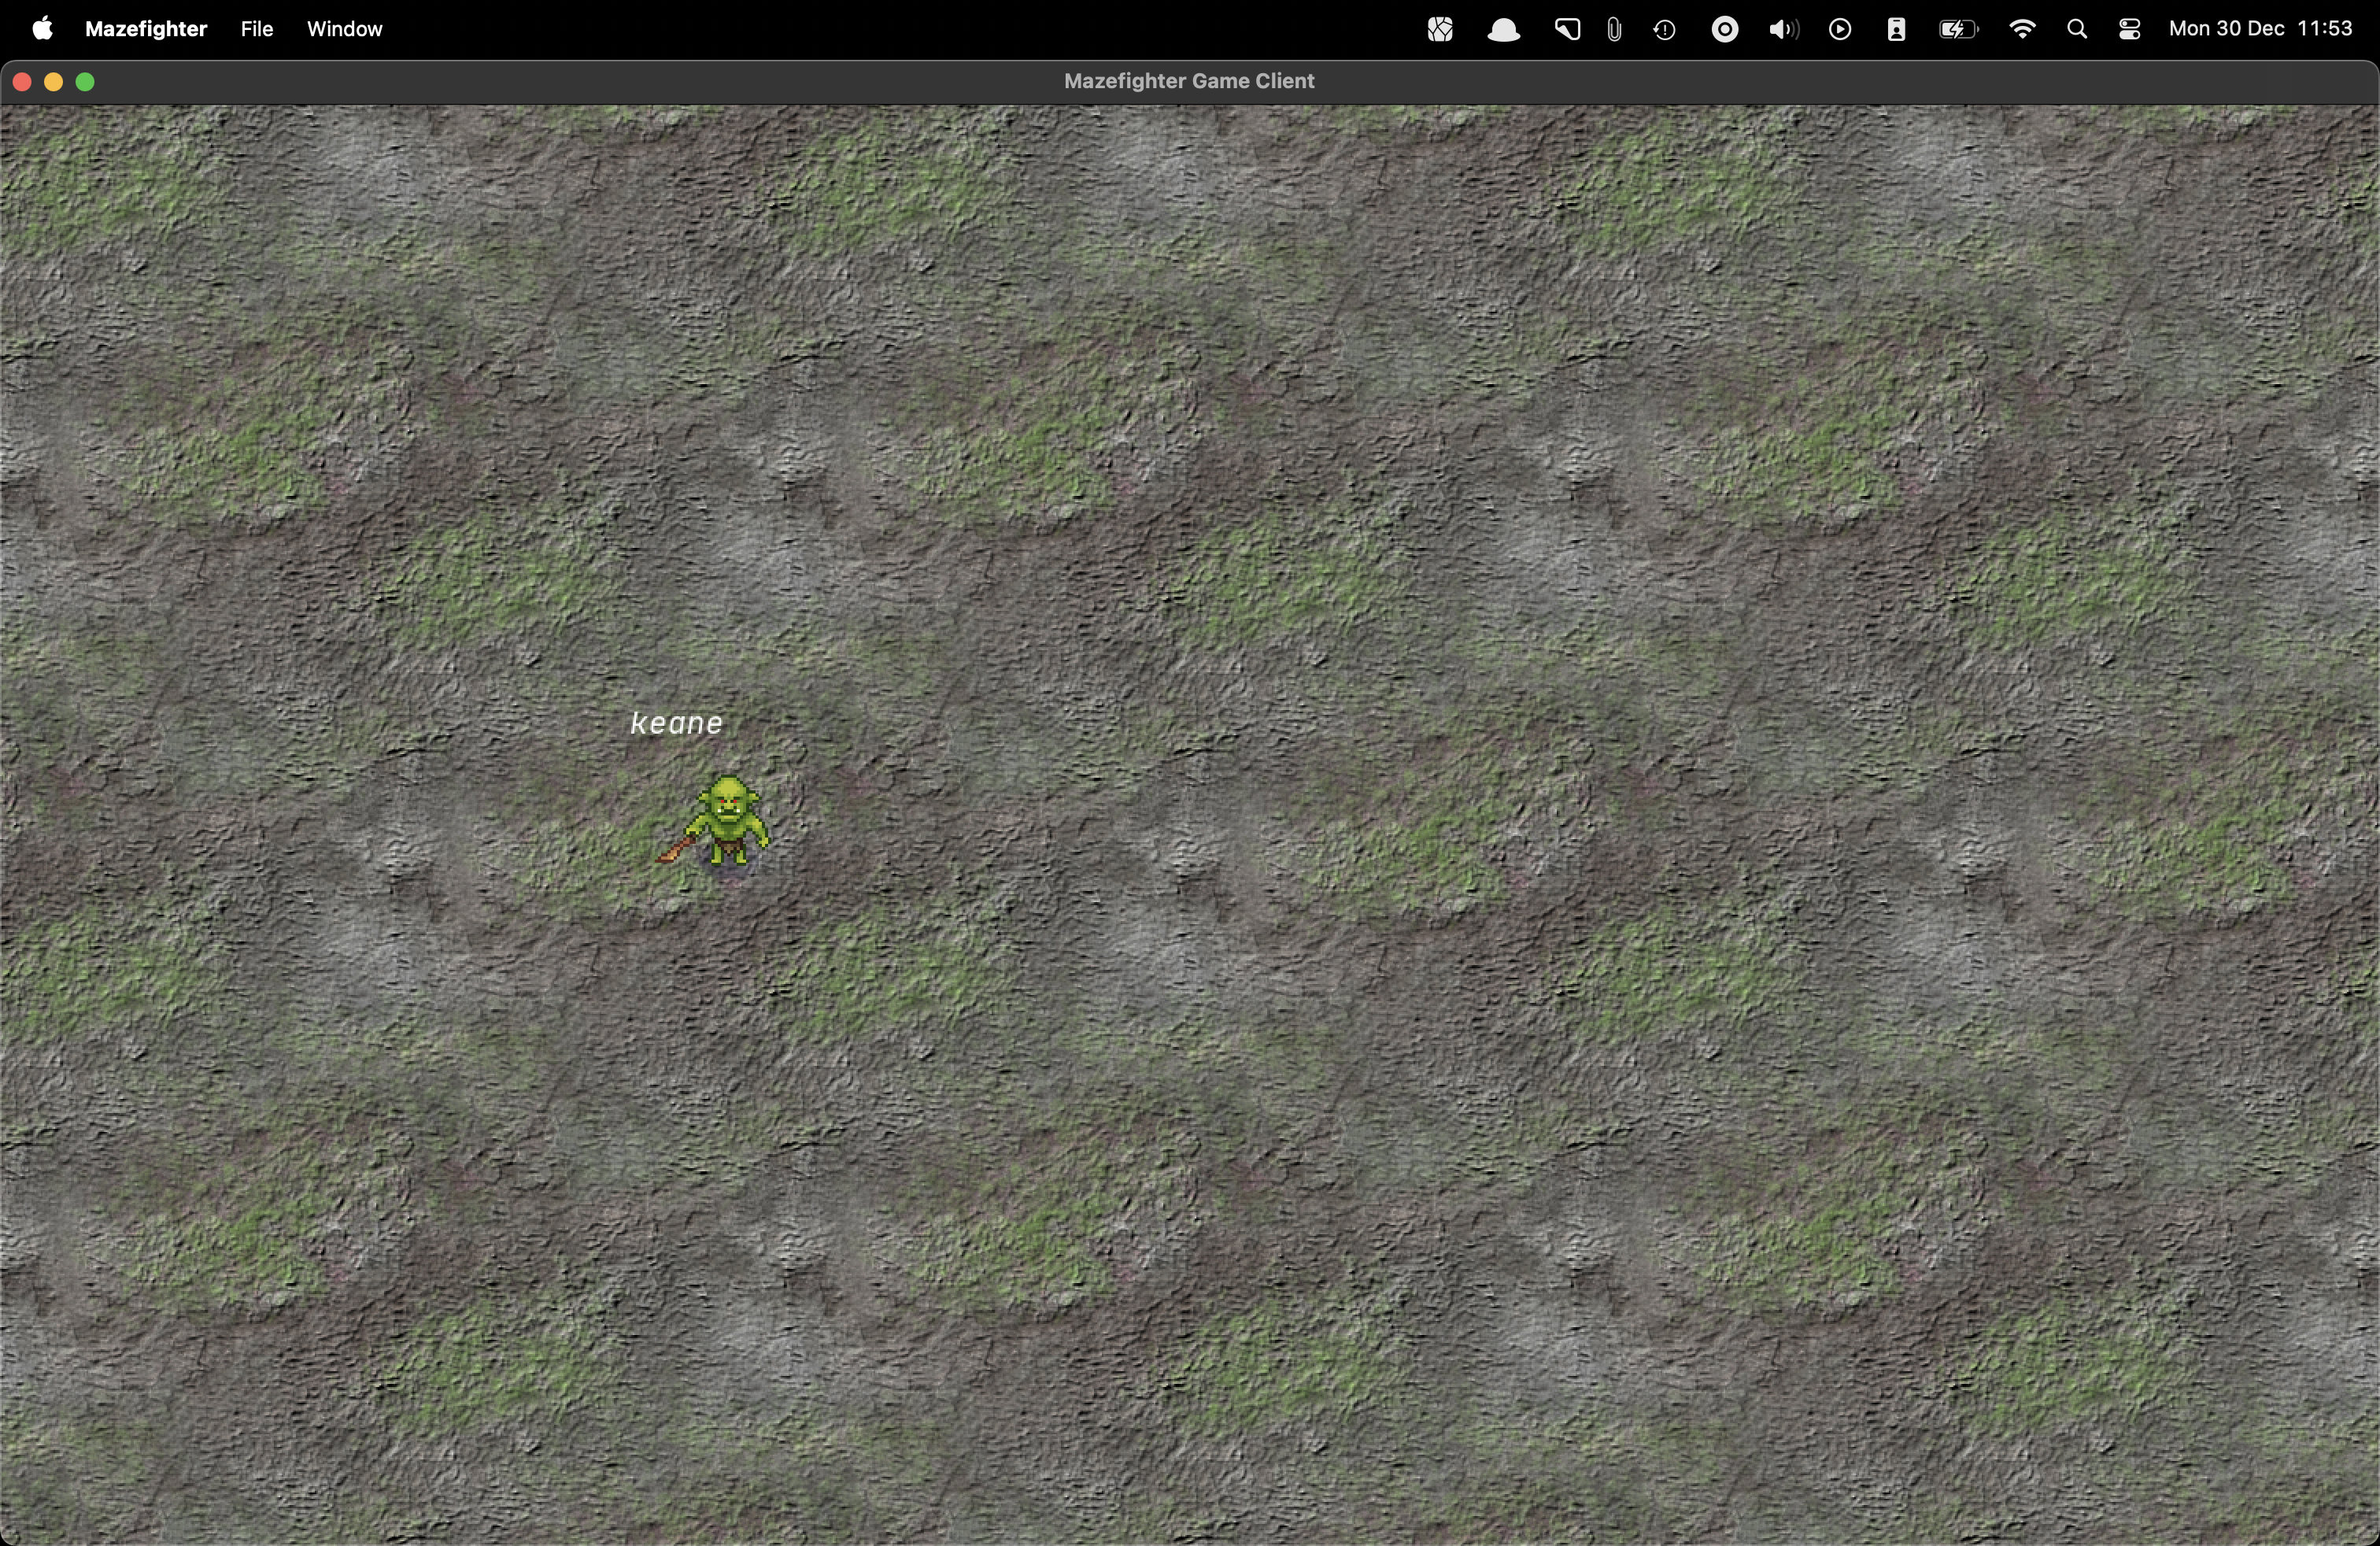
The site to access the dmg is at https://labyrinthiansite.vercel.app/
First Steps
Back in BAGEL I, I did promise that I would get the game out before the end of the year. I did in fact do so. By cloberring some visuals together, I did manage to make it look somewhat decent.
Lessons Learned
- Deploy early and often. This is another key lesson. Early deployments help iron out problems cross-platform. If you're going to need to deploy, it pays dividends to ask when is the earliest I can deploy and try doing so. This will help you find chinks not just in the code but also in your deployment process.
P.S I have exams to attend to after this post so I will be on break for about 5 days before I can come back to this.
Footnotes
-
It is non-trivial to setup Boost on Windows. https://www.linkedin.com/advice/0/how-do-you-install-boost-c-windows-skills-software-development-cmoaf ↩
-
get the fuck off localhost. s/o buildspace. ↩
-
I know, I know. I was taken aback too. You'd think it was some executable like .exe s are. ↩